Monday, October 7, 2013

DIY Rustic Shutters

While we were installing cement board throughout the kitchen and dining room this weekend, I found myself spending a lot of time outside looking over my yard. I was doing the measuring and cutting, and J was mixing and spreading mortar. Since spreading the mortar takes much more time than cutting and is really a one man job, I decided to find a few small projects to fix up the yard. 

One thing that I've always thought would spruce up our detached carport is shutters. There is one sad little window into the shed portion of the carport, and it's just there. Every time I look at it, I imagine a cute little bench beneath the window surrounded by cute shutters and bright little pots. With my waiting time, I thought this would be the perfect opportunity to make that happen! 

This past spring, we cleared out most of the shed which hadn't been done in forever. I mean, ever. So, that left us with tons of garbage which we slowly put out with the trash one bag at a time. However, this also left us with over 100 cans of rotten, moldy, rusty paint cans since J's brother used to own a painting company and also used to use the shed for storage. They've been stacked next to the carport as we let the mostly empty ones dry out, and needless to say, it has not been a pretty sight. 


So, I removed the paint cans, raked and leveled the ground, cleaned and stored the wood with the rest of our wood, then got to building my shutters! 

Fortunately, I already had enough wood for this project along with the exterior screws and wood stain, so I started by measuring the height of my window. This specific window is 39" tall, so I made my shutters 40" tall to give an extra half an inch to the top and bottom to make sure they don't end up looking too small. To determine how many pieces of wood I would need, I measured the width of the window (which was 30") and decided that each shutter should be 15" wide so that they are properly proportioned with the window itself. If you have the room, I think you should always make each shutter half the width of the window so that if they were real shutters instead of decorative, you would be able to fully enclose the window. This is what will give them an authentic shutter look. 


I measured the boards that I had on hand (2x4 furring strips) and decided that 4 boards would be closest to 15" across. I then put two more boards across those 4, marked, and cut them. 


Before attaching everything, I sanded the edges of all of the boards that I just cut to make them look more finished. The boards on the right of the photo below are sanded, and those on the left are not. They just look more finished that way, right? 


I then ran some wood glue across the cross boards and let them dry a bit so that they would hold together once I screwed them in. Next came the screws! I made sure to use exterior screws so that they wouldn't deteriorate with the weather. 

For this step, I didn't mind if the screws showed from the front because I was going for "rustic" anyways, so I screwed right into the front of the shutter into each board. 


I then used Rustoleum Dark Walnut wood stain and a paint brush and simply brushed it into every crevice. 


After letting them dry for a few hours, I screwed them right into the side of the shed with 2.5" exterior screws. 


Now, this overall project isn't quite finished, but the shutters look fantastic. They make the window look larger and just add a cute rustic touch that had been missing before. Once they've dried a bit more, I'll brush them with a coat of clear sealer. 

To add to this project, I've sprayed a plastic bench and three hanging pots which I'll post as soon as I have them hung!

Wednesday, October 2, 2013

Bottle Cap Wind Chime

I have been collecting beer caps for a looong time. Being a total pack rat, I find myself collecting anything that is colorful, abundant, and has relative similarities between pieces.

Beer caps are fantastic.

During every party we've had over the last few years, I've put out the cap bowl, and attempted to collect every beer cap that popped in my house. Now, after a few beers, the attention to detail just isn't there to get a group of party people to drop their caps in a designated bowl, so I'd bet that I've only successfully collected about a fifth of the caps I should have. However, that only makes the caps that I DO have even more fun. As I sifted through them for this project, I noticed that I wasn't even sure what kind of beer some of them were. Then, there was the occasional Bud Light Lime cap which brought back memories of the only night we brought those home. Apparently, I threw in a couple of our Johnnie Walker caps in as we finished off a bottle of Black Label which I don't recall doing, but I'm glad that I did. Looking at those caps, I knew that this wind chime would serve as a personal "drunk history" of sorts - bringing up stories and reminding us of fun nights gone by.

I started by sorting through the caps to make sure that I had a nice variety of brands.

Then, I lined them up on the coffee table to see how they would look next to each other once they were attached. I ended up rearranging all of them based on color so that the yellow lemon beer caps, green lime caps, blue Sam Adams caps, and black Guinness caps were spread out to create a nice random feel and to avoid getting any spots that were too dark or too bright in one clump.

Next, I grabbed my tools:

- a scrap piece of 2x4 I had out in the shed
- pliers
- needle nose pliers
- a wire cutter
- my drill and 3/32 drill bit
- 10mm safety wire
- about 80 bottle caps
- a handful of shiny plastic beads I've had FOREVER but wasn't quite sure what to do with

To begin assembly, you'll want to make sure to grip your bottle caps with pliers while you drill. I started by just holding them down with my hands, but as we've all learned at one point or another, bottle caps can be deceivingly sharp. Also, you shouldn't put your fingers that close to a moving drill bit.


Drill two holes into each cap. Attempt to put the holes directly across from each other so that the cap will hang straight once it's attached to the wire. 

*Drilling through metal is different than drilling through wood. It does not take even pressure and drill slowly through until you reach the other side. Just pick a spot, start drilling, and it will suddenly punch through the metal. 

I didn't bother paying attention to which direction the holes would cause the caps to hang because the color placement was more important to me, but if having all of your caps facing the correct way is important to you, then I would suggest marking all of your hole spots with a sharpie before drilling so that you don't drop the ball in the middle of the project. When you're looking at the back of something like 80 caps, it's easy to mix up the direction of the faces. 


The holes will be kind of jagged, so I recommend using gloves. I noticed the day after completing this project that my fingers had tiny scratches and tears on them which could have easily been avoided with gloves. I'm much more of a "hind sight is 20/20" kind of person when it comes to DIY projects. Once I get an idea, I tend to just jump on it without much prepping or safety consideration. However, I do NOT recommend doing your projects that way. Always consider safety first! Do as I say, not as I do, right? :)


Once I had holes in all of the caps that I planned to use, I cut about 90 pieces of safety wire at about 4.5" long each. Then, I fed one end of a piece of wire into one hole from the back of the cap. Take the wire and wrap it around itself until it creates a nice tight spiral.


Then, use the needle nose pliers to grab that end of the wire and crimp in into the coil so it doesn't catch on anything. I then slid a bead onto the end of the wire, turned the whole thing around and attached the other side of the wire to another bottle cap the exact same way as this one. This means you are only using one wire in between each cap, and I only put a bead on every other wire or so.

For my hanger, I got really lucky. We are in the process of renovating our kitchen, and I ended up with an extra metal pole from a cabinet. So, I grabbed that, ran a string through each hole in the pole, and then ran some wire through the entire pole to hang it!


I absolutely adore this wind chime. Now, I will admit that it doesn't make the musical sound of a standard wind chime, but the caps do make a cute little metallic clink as they tap each other in the wind. I also love how bright and colorful it is, which is hard to come by in our yard since we don't have a lot of flowering plants back there. Overall, it's a super cheerful, easy project that takes a little bit of time to put together but is completely worth it.

I love sitting in the sun and thinking about all of the good times those caps facilitated :)

Friday, August 23, 2013

Coat Closet Door Makeover

Finally, we're past the boring introduction posts!

Now, none of the future posts are going to be real time posts since I have a TON of DIY projects piling up on my phone that I did long before I started this blog. So, if I forget any important points that you need to help you do this project, I'll be more than happy to go back and add whatever is needed - just let me know!

Let's start with an easy one.

Our home was built in 1962, and I'm pretty sure the interior doors haven't been touched since. They are not pretty, and the house is full of them. They're plain, look like plywood with the odd grain, and just make the entire house look outdated.

We first moved into our home just before Christmas. It was fantastic - we bought ourselves a house for Christmas! But we also bought ourselves a TON of work to go with it. My thoughtful mother brought us a gift and it was one big box. I looked inside and YAY! Bronze doorknobs for the entire house. Love. So, in my excitement, I completely forgot to take a photo of the "before" knobs, but I'm sure you all can picture them. Brass, rusted, squared edges, with nicks and scratches across the face. It's not really something you notice until you notice it. Then, you don't even want to use them because they're just so ugly. Or at least that's how my OCD mind works. Once I notice it, I MUST find a way to fix it or else it will no longer exist to me and will probably end up in the Goodwill box whether they want it or not.

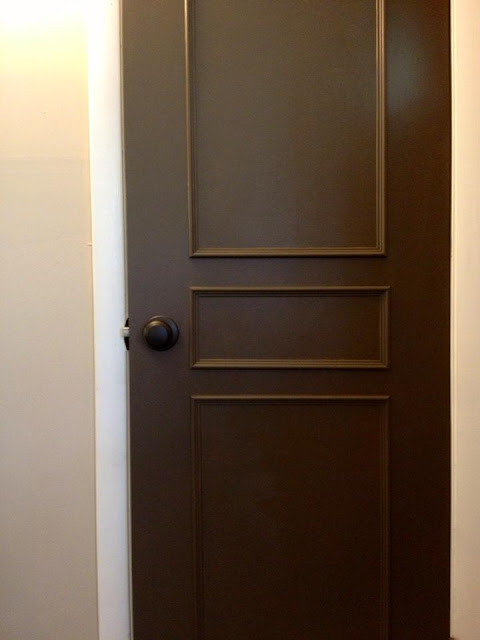
So, here they are! Our beautiful new bronze doorknobs surrounded by an unattractive, outdated door.


Looking at these doors eventually drove me mad. So I started looking to buying new interior doors. At $100 a piece, that idea was immediately out the window. On to the DIY forums!

First, I found this ADORABLE post on Little Green Notebook for a bright yellow door.


Too cute, right? But that look just wasn't right for our small, ranch home. We've decorated with a transitional style that lies somewhere between modern and traditional cottage, and our home is already filled with color. So colored doors were out.

Next, I came across the black-painted doors at A Well Dressed Home, and I was in LOVE.


So I pulled out the sketch pad and drew up a plan for my own door:


I started with what looked normal for the bottom section of the door. 10" above the ground looked about right. Then for the side measurement, I went to the knob and measured to just inside of it landing on 4.5". Then I took a pencil and just started drawing on the door where I thought the molding should go, made a mock version on the Mixture app on my phone to take to the store in case I needed to glance at it, added all of the measurements, and off to Home Depot I go!


I found this fantastic little molding and debated for a moment whether I should get something larger. I decided I'd go with the smallest molding because it would look more properly scaled on the thin Entry Closet door that I was working on. I also made sure to get a shape that was rounded on both ends so that the molding would "flow" across the door per se. Here's what I ended up with:


I grabbed my little miter box, started measuring, and began cutting my pieces at 45 degree angles. I then wiped down the door with a lightly dampened paper towel and used Gorilla Wood Glue to glue the molding pieces along my drawn-on lines on the door.


Over in the paint section, I got samples of the two colors that jumped out at me first, and slapped them each on a section of the door to see which I preferred.


Looking around the room, I thought the lighter color would blend too much with the Behr Castle Path taupe that was already on the walls. So, I went with Valspar Italian Leather to give the doors some contrast and to create a more traditional look. I let the molding dry overnight so I wouldn't mess with the glue while painting, and then I used a paintbrush for the entire door.
I absolutely love the way it turned out. The door now looks like solid wood and the deep contrasting chocolate-type brown is just fabulous and really pulls in all of the bronze accents throughout the house.


Now that I've tested on this door, and I've seen just how ridiculously easy this project is, I'll be doing the rest of the doors in the house!

Here she is

Our kitchen.

She served her duty. The kitchen was originally designed and built in 1962. She had a refrigerator, teeny tiny wall oven, stove top, and a sink. No dishwasher. No microwave space. No counter space. No human space. The actual kitchen area was confined into this small U shape that could only contain one human at a time with a small counter-height opening looking into the former dining room/den.

This one-man layout always left me envisioning J's grandmother as a young mother in the 60's, wearing an apron over a dress with her black hair in tight curls around her loving face, pulling a cake out of the tiny oven that was baked to perfection on Christmas evening. Moments like that make me want to leave the kitchen exactly as it is and continue the tradition of this one family home. As sweet as that fleeting thought is, it's always followed by the much more realistic vision of her standing in the tiny kitchen, drenched in sweat because the layout doesn't allow for air flow. Then, after attempting to cook an enormous meal for the entire family in a half size oven, she is left washing mounds of dishes and silverware by hand and piling them on the teeny counter top next to the sink to dry.

http://flickrhivemind.net/User/Nava%20Atlas/Timeline

Renovation, here we come.


Wednesday, August 21, 2013

Our home

J and I bought our first home from his family, and the sale was rather bitter sweet.

J's grandmother had been getting a bit foggy. For a while, the family all took care of her in her home where she had lived for the last 50 years, and, for a while, that worked just fine. After that while, however, it stopped working. She was leaving the front door open through the night. She would wander across the street to the church and ask someone to call her grandson. She stopped eating because she couldn't see the food in front of her anymore. The family decided that the safest option for her would be to move her into an assisted living facility where she could be cared for and watched over. As many of you know from first hand experience, this was hard on everyone. Financially and emotionally, everyone was tired and worried - about everything. So, grandmother was feeling confused and wondering why she was no longer in her home - the home she had raised J's father and aunts in, the home built for her and her husband before he passed. J's father and sister began to realize that the house now sat empty, and they would have to sell it.

The house had not been updated in the last 50 years since grandmother was not much of a decorator, and the kids were all grown and had their own homes to worry about. This left them with the choices of going into the house and renovating/redecorating or just to sell the house exactly as it was and take the hit on the price. They decided to sell the home without any repairs because with jobs, homes, and families of their own, they simply didn't have the time. Once I heard details of the plan, I nudged J. We wandered through the house, and my mind absolutely raced with everything I envisioned us doing with it. So, we sat down with J's father and told him what we wanted. We wanted to buy the house exactly as it was and fix it up ourselves, and he loved it. The family was relieved that the home would stay in the family and that it would get the attention it needed without them having to give up all of their extra time.

Overall, we knew going in that we had a shit-ton of work ahead of us, but that it would be worth it. We also knew that we had finally found our first real home.


Before our first house

J and I have rented two condos together in the past.

Our first condo was a beautiful, brand new skybox condo uptown with a private rooftop that had a fantastic view of the city. We lived there with an awesome roommate, and after living there for a little less than a year, his current girlfriend moved in too. It. was. phenomenal.We stayed up on weekends drinking and playing cards, walking to bars near the condo, and throwing the kind of outrageous parties that you thought only existed in film-land. Eventually, our awesome roommate got a job offer in Florida, and the partying finally came to an end. He and his girlfriend moved away, and J and I found a more affordable condo for just the two of us.


We moved into an older condo neighborhood that consisted of mostly young professionals, young families with small kids, and retired folks who lived alone but still knew how to have a damn good time. The condos themselves were OLD AS DIRT. They were built in the 1940's (badass, right?) and while some of them were updated and absolutely fabulous, the one we found was, sadly, not. Not even close. However, this being our first place together alone, I was more than thrilled when the landlord said "Paint? Of course you can paint! In fact, you can do whatever you want to the place because you really can't make it worse." Trust me, he was not wrong. I spent the next year and a half making that condo our first home. After spending so much time and money fixing the place up and realizing that I didn't have ANY before & after photos, I decided that I would never make that mistake again. So, here is one of the very few photos we have of the cozy little living room in our last condo. Filled to the brim with hand me down furniture and hand-made wall art.


We loved this condo with almost all of our hearts. It was our first home, and the location was beyond fantastic. We were in a lovely little neighborhood, but that neighborhood was walking distance from a street full of bars, restaurants, and the newly renovated bowling alley. However, this condo had roaches like no other. The buildings were old, the trees surrounding the buildings were old, and the buildings insulation was poorly done which was painfully obvious as soon as the weather changed. For those reasons, we started looking for another place once we realized that we had about six months left of our year and a half lease.

We looked and looked and looked. We looked for six full months and at the very last minute, luck smiled upon us. We landed in our very first house.

Tuesday, August 20, 2013

This is us.

J and I met when we were young. So very young. I was fifteen and he was eighteen. Oh, the uninvited cautionary advice I received after revealing that lovely little factoid to anyone who asked. Despite everyone's best attempts to warn me that his age was the only factor I should consider, I just so happened to notice that he was also fun, passionate, supportive, and he adored me.

Friday, September 1st, 2006 - We met at a mutual friend's birthday party. As soon as I saw him, I just had to have him. I asked around and found out he was single, then I got his attention, or "hopped around him the rest of the night like a yappy chihuahua" (as he so lovingly tells it now).

Friday, September 8th, 2006 - I got his number from our mutual friend and invited him out to dinner with our group, so I could sit next to him. The night went from dinner to ice cream to my house where we played pool in the basement. My friend stayed the night, and J couldn't bring himself to leave until 2am. It was a hilarious and fantastical night. 

Friday, September 15th, 2006 - I invited him to a charity gala that I was attending with some friends, and when he picked me up, we found ourselves alone in his car as we drove over. As we talked, we realized that we had everything in common, and later in the night while we were dancing in our own little world at the edge of the floor, he asked me to be his. 

We've spent every waking moment together since.